NetVizura is a complex software composed of a few databases, Tomcat, and a lot of code, supported on Windows and numerous Linux distributions for AMD64 architecture. With the advent of 8GB RAM RPI 4, there have been numerous projects using this version in its implementation. Maybe the most famous would be ESXi on ARM with project Monterrey (we internally dominantly use Proxmox, while Xen and ESXi we use from time to time). We think that with time, Raspberry Pi 4 is becoming a first-class citizen of the new IoT and Edge computing spaces.In this blog post, we will explore ARM SBC (Single Board Computer) and the possibility of running NetVizura on Raspberry Pi 4.
Raspberry Pi 4 specifications and history
Raspberry Pi 4 is the latest release of the Raspberry Pi foundation, and the first one to be shipped with 8GB RAM. There are, of course, lower RAM models (1, 2, 4 GB), but because NetVizura runs two databases in the background, it is always preferable to have more RAM. Besides RAM, it possesses a 1.5 GHz quad-core, and a full Gigabit Ethernet port, 2 USB 3.0 ports, and an SD card port. Raspberry Pi 4 is powered via a USB-C port. All of this is pretty much enough for running NetVizura (check out System Requirements).
The only downside of Raspberry Pi 4 is the SD card used for OS. Databases like PostgreSQL and Elasticsearch prefer a lot of IOPS, leading to the fast burn of SD cards. That is why it is recommended to use an external drive for PostgreSQL , Elasticsearch, and raw data.
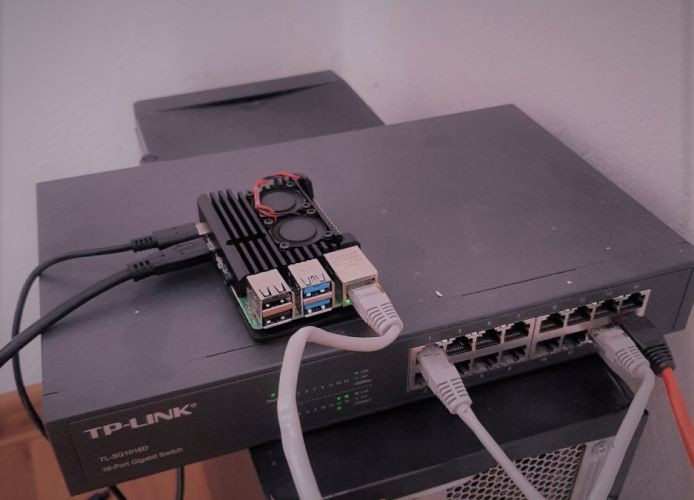
Raspberry Pi 4 in action
Raspberry Pi 4 Operating System
The distinction between Raspberry Pi 4 and, let's say, regular PC is in a different architecture. PCs use AMD64 architecture, while Raspberry Pi 4 uses ARM64. Meaning, we cannot copy all from our workstation in terms of the installation procedure, hoping that everything would work due to numerous incompatibilities. However, luckily for us, the Raspberry Pi ecosystem is one of the best in the world.
Raspberry Pi 4's default OS distribution is Rasbian, or how it is now called Raspberry Pi OS (this is Debian 10 base). You can download operating systems from Raspberry Pi's website and burn them onto an SD card with software like Etcher, win32diskimager, Raspberry PI imager, etc. The issue with the current RPIOS distro is its 32-bit nature, while Elasticsearch and similar software require a 64-bit distro. However, this should be solved with RaspiOS arm64 , currently in the beta phase.
As mentioned in the beginning, an SD card is insufficient for database and raw data storage, so there are two options when it comes to running NetVizura on Raspberry Pi 4:
1. to move the database and raw data onto an external drive (easily configured)
2. to boot Raspberry Pi 4 from an external drive (requires up-to-date BIOS and configuration from the PI itself).
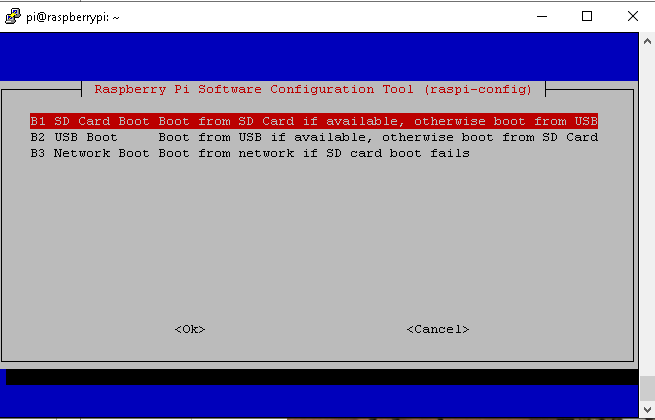
Option 2 can be managed with the raspi-config command combined with option B2, as you may see in the screenshot above.
Installation
Once the system is setup with one of the two options listed above, we need to get it up to date, with either apt update && apt dist-upgrade -y, or apt update && apt full-upgrade -y. Then we need to install java8, but because it is not available in Debian 10 Buster, we need to add another repo with the following commands:
apt-get install wget sudo dirmngr software-properties-common fontconfig –y
wget -qO - https://adoptopenjdk.jfrog.io/adoptopenjdk/api/gpg/key/public | sudo apt-key add -
sudo add-apt-repository --yes https://adoptopenjdk.jfrog.io/adoptopenjdk/deb/
sudo apt-get update && sudo apt-get install adoptopenjdk-8-hotspot -y
#prevent java 11 from installing
sudo apt-mark hold openjdk-*
The next step would be to install Tomcat 9:
sudo apt-get -y install tomcat9
sed -i '/JAVA_HOME/d' /etc/default/tomcat9
echo "JAVA_HOME=/usr/lib/jvm/adoptopenjdk-8-hotspot-amd64" >> /etc/default/tomcat9
systemctl restart tomcat9
Postgres is installed straightforwardly with Debian 10:
apt install postgresql
Before we install Elasticsearch, some additional steps are needed to allow Tomcat to work with NetVizura:
#setting tomcat write permissions to netvizura folders
if [ ! -f /etc/systemd/system/tomcat9.service.d/logging-allow.conf ]; then
sudo mkdir -p /etc/systemd/system/tomcat9.service.d
echo -e "[Service]\nReadWritePaths=/var/lib/netvizura\nReadWritePaths=/etc/.netvizura" | sudo tee /etc/systemd/system/tomcat9.service.d/logging-allow.conf
mkdir -p /etc/.netvizura
chown tomcat /etc/.netvizura
mkdir -p /var/lib/netvizura
chown tomcat /var/lib/netvizura
sudo systemctl daemon-reload
sudo systemctl restart tomcat9
fi
Elasticsearch installation is done with manual download of the .deb file, and by installing it with dpkg -i.
Additional optimizations for Elasticsearch are:
total=$(free -m | grep '^Mem:' | awk '{print $2}')
if (( $total < 96000 ))
then
elastic=$(( $total/3))m
else
elastic=32000m
fi
#JVM optimization
sed -i "s/^-Xms.*/-Xms$elastic/g" /etc/elasticsearch/jvm.options
sed -i "s/^-Xmx.*/-Xmx$elastic/g" /etc/elasticsearch/jvm.options
#node and cluster optimization
grep -q '^cluster.name' /etc/elasticsearch/elasticsearch.yml && sed -i 's/^cluster.name.*/cluster.name: netvizura/' /etc/elasticsearch/elasticsearch.yml || echo 'cluster.name: netvizura' >> /etc/elasticsearch/elasticsearch.yml
grep -q '^node.name' /etc/elasticsearch/elasticsearch.yml && sed -i 's/^node.name.*/node.name: nv1/' /etc/elasticsearch/elasticsearch.yml || echo 'node.name: nv1' >> /etc/elasticsearch/elasticsearch.yml
grep -q '^bootstrap.system_call_filter' /etc/elasticsearch/elasticsearch.yml && sed -i 's/^bootstrap.system_call_filter.*/bootstrap.system_call_filter: false/' /etc/elasticsearch/elasticsearch.yml || echo 'bootstrap.system_call_filter: false' >> /etc/elasticsearch/elasticsearch.yml
grep -q '^discovery.type' /etc/elasticsearch/elasticsearch.yml && sed -i 's/^discovery.type.*/discovery.type: single-node/' /etc/elasticsearch/elasticsearch.yml || echo 'discovery.type: single-node' >> /etc/elasticsearch/elasticsearch.yml
grep -q '^cluster.routing.allocation.disk.threshold_enabled' /etc/elasticsearch/elasticsearch.yml && sed -i 's/^cluster.routing.allocation.disk.threshold_enabled.*/cluster.routing.allocation.disk.threshold_enabled: false/' /etc/elasticsearch/elasticsearch.yml || echo 'cluster.routing.allocation.disk.threshold_enabled: false' >> /etc/elasticsearch/elasticsearch.yml
#limits optimization
sed -i '/^elasticsearch/d' /etc/security/limits.conf
cat >> /etc/security/limits.conf << EOF
elasticsearchhardnproc 4096
elasticsearchsoftnproc 4096
elasticsearch-nofile65535
EOF
#system optimizations
grep -q '^vm.swappiness' /etc/sysctl.conf && sed -i 's/^vm.swappiness.*/vm.swappiness=1/' /etc/sysctl.conf || echo 'vm.swappiness=1' >> /etc/sysctl.conf
grep -q '^vm.max_map_count' /etc/sysctl.conf && sed -i 's/^vm.max_map_count.*/vm.max_map_count=262144/' /etc/sysctl.conf || echo 'vm.max_map_count=262144' >> /etc/sysctl.conf
sysctl -p
systemctl enable elasticsearch
systemctl start elasticsearch
Now everything should be ready for NetVizura deployment. We should download .deb file for Debian 10 Buster, and just install it in the same way as Elasticsearch - with dpkg -i.
After the installation, NetVizura should be running and available via http://localhost:8080/netvizura, or the external IP of Raspberry Pi 4.
This blog has been an experiment since we don't officially support NetVizura on ARM architecture. However, as we can now see, not only is it possible, but the performance on Raspberry Pi 4 is really great for a cheap (around 150e for the complete machine) and frugal platform.


